Monday, May 16, 2011

Getting Settled

My good friend, Dawn, has finally found a space that she feels she can finally call home.  She enlisted my help to bring all the different pieces together and we decided to go on a small trip to Ikea.

It's pretty obvious that we were rushed as this was how we loaded up the cart:


Pretty fancy, right?

We're going to be adding some art work, pillows and curtains to make this space reflect who Dawn is and create a cozy environment for her. Here are some pics of Dawn's current living situation:


So we have some plans, fabric and patterns that we're going to use to spruce the place up.  It's going to be a challenge to work with what we have and keep everything within Dawn's budget. 


Today we'll be tackling pillow cases and curtains.  More to come, so stay tuned!

Saturday, May 14, 2011

DIY - Upside Down Planters

I have struggled with the my need for pretty things and my need for practical things.  When I'm stuck in this predicament, I tend to break out the DIY skills to create something that meets both purposes.

I've seen the Topsy Turvy on TV and the stores and I have to say, I've been very intrigued.  They have received great reviews and I have yet to meet anyone who has committed to gardening and failed to make the Topsy Turvy work.  But good grief are they ugly!  I've seen several tutorials on how to make your own upside down planter but they, too, were ugly as sin.  Time to break out the ingenuity.

So, as I was walking down the aisles of Home Depot, an idea popped into my head.  Empty paint cans!  They only cost about $4 each (or you could use existing ones).  They have handles, a hole at the top to put soil in, and are rust resistant.  I got really excited to do this project and failed to take pictures along the way but I've made some illustrations to make up for it.

What you'll need

  • Empty Paint Cans
  • Permanent marker
  • Spray paint
  • Painter's tape
  • Electric Drill
  • Jig Saw
  • Extra Large Planter
  • Soil
  • Plants
  • Gardening Hook
  • Gloves
  • Coffee filter
  • Scissors
Step One - making the planter
First thing I did was wash them out with bleach.  Even though I was pretty sure that these were clean, I'd like to start out clean and fresh for my plants.

Turn the planter upside down.  Using permanent marker, draw a circle about 3 inches diameter.  

Using the drill, make holes every 1 centimeter.  Be sure to wear gloves as the metal shards can be sharp and it's rather painful and difficult to take out metal slivers.

You can either use a jigsaw or a pair of heavy duty scissors to cut the hole.

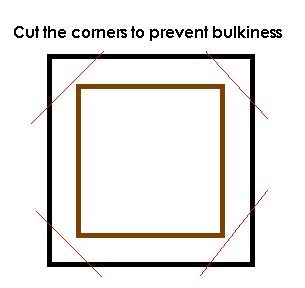
You will need the coffee filter to prevent the soil from escaping the hole at the bottom.  Trace the bottom of the can on the filter and make it about 1 inch smaller.  Next, you grab the left over metal from when you made the hole in the can and trace this on to the center of the filter.  With a pair of scissors, cut along the red lines:


Place the filter inside the can

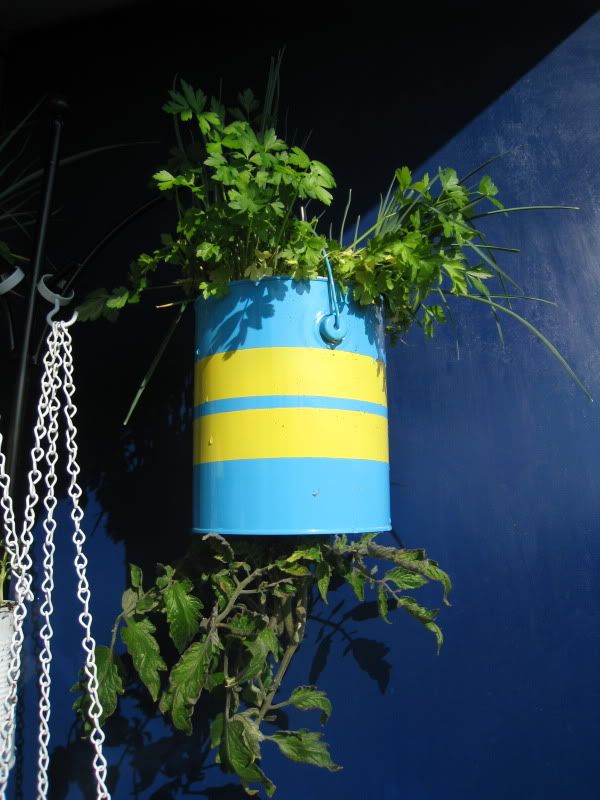
Now you have an upside planter.  Yeah - it's THAT easy.  Now to make it pretty.


Step Two - painting the can

To paint stripes on the can, I sprayed the entire can twice, allowing about 30 mins drying time between coats.

Using painters tape, I created the design that I wanted.  I thought about making Chevron stripes but I was just too lazy.  

Viola:

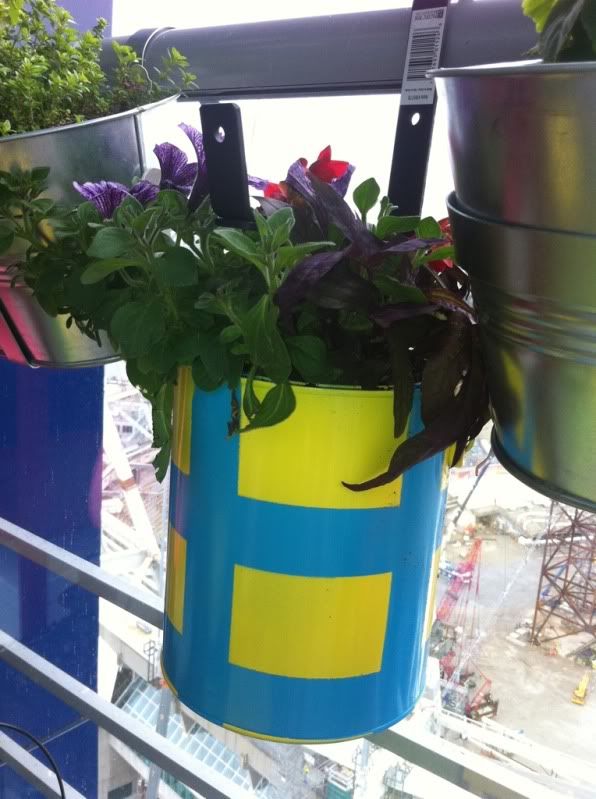
Okay, these aren't upside planters but just a regular paint can planter but I wanted you to see the effect.


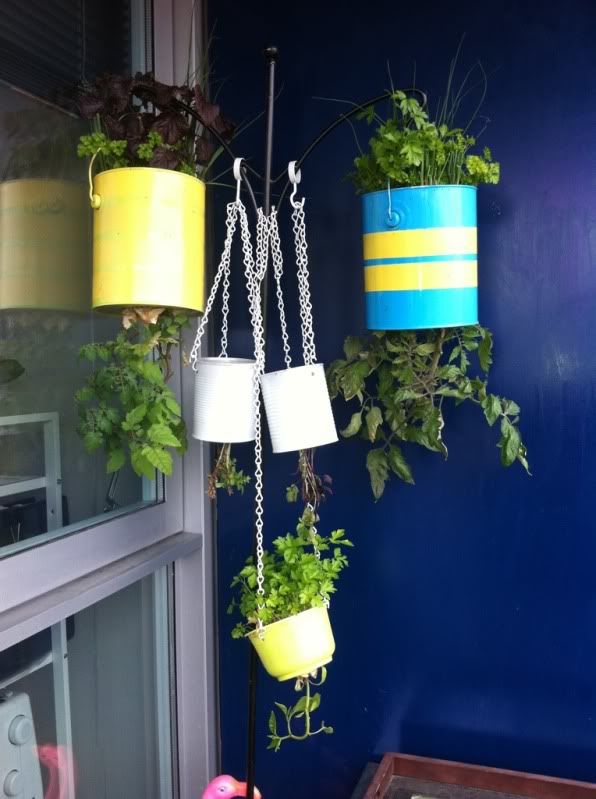
Step Three - making the upside down planter stand.

You'll need a garden hook:


And a large plant pot - the pot needs to be about .5 ft taller than the "fork" of the planter hook.  

Fill up the plant pot about 30% of the way.  Place the planter hook in the pot and press down so it is firmly in place.  Fill the rest of the pot and periodically pat down the soil so that it is firm.  Fill the pot all the way to the top.  For extra security, you can also put rocks at the top to keep the planter hook steady.

Step Four - fill the planters

I found this to be a tad bit tricky.  It is best if you use younger plants because the larger plants are difficult to wiggle in because of all their branches and leaves.  

Take the tomato plant out of the pot and put it into the Upside down planter with the plant side in first:


Put the upside down planter on a hook and then fill the rest of the planter with soil.

Note:  If you would like to put like to put herbs on the top of the planter like I did - go for it!  It actually enhances the taste of the tomato!


That's it!  Really!

Friday, May 13, 2011

Rainbow brick road

It's no secret that I like colour.  When I moved into my new apartment, I had to do a huge overhaul on my wardrobe.  I go through my closet at least once a month to cull and bring the stuff that I don't want anymore to consignment (yes, I have a lot of clothing, and yes, I could probably shop a bit less).  One day I went to my closet and noticed that there was an overwhelming abundance of black, white and grey - it freaked me out a bit because that isn't my personality at all.  I threw on my black jacket and made a quick dash to do some retail damage to brighten up my wardrobe.

If you've seen some of the pictures of my home, you'll see that I am not shy about using small doses of colour here and there.  I find the brightness lightens my mood and often stimulates my tired soul.

I've been to Macau, China, twice.  It's the hometown of my mother and has a very interesting mix of architecture due to the colonization of the island by Portugal.  Rich colours from both cultures line the tiled streets.

Whether it's the Flavelas of Brazil or the rainbow filled districts of Singapore, these pictures remind me that here is so much more to see in this world.


Flavelas in Rio and San Paulo, Brazil - by Haas&Hahn

pic name
Singapore

pic name
Malaysia

pic name
Bo Kaap - S. Africa


pic name
Detroit

pic name
 Rotterdam, Holland

pic name
China

pic name
Macau, China


pic name
Jonna Pohjalainen, Finland

pic name
K. Dimopoulos, Vancouver

pic name
Alicante, Spain


If I had a magic carpet or an unlimited amount of funds like Scrooge McDuck, I'd travel to each of these places to feast my eyes on the technicolor architectural of that city/ neighborhood.

Wednesday, May 4, 2011

Tea Time

One of my new year's resolutions is to enjoy tea rather than use it as a jump start to my day.  While I drink less of it now, I certainly enjoy it more and buy quality loose leaf rather than the stale bagged type.

Now, I'm not one to collect tea cups, fine china, porcelain figurines (actually, that last one is a lie; I have quite a few ceramic or porcelain "Pet's" around the house) but once in a while I stumble across something so pretty that I'm tempted to collect them like one them folks on Hoarders.

My favourite colour combinations are bold, jewel tones with gold accents, less roses and poses, more lace-like designs. 
pic name
Flea Market Studio

pic name
Daisies on Etsy

pic name
Classy Option

pic name
Bella Couture


pic name

pic name

pic name

pic name
All pictures courtesy of Shop1st Biz

pic name

pic name

pic name

pic name
All pictures courtesy of Shop1st Biz

pic name

pic name

pic name

pic name
All pictures courtesy of Shop1st Biz


Courtesy of Google

Vintage Tea Canisters from Flea Market Studios

I've also seen some clever re-purposing of tea cups and tea canisters:

As planters:
Photo Courtesy of Apartment Therapy

As jewellery organizers:


Even as ceiling lights!
Kingdom of Style

Hope you enjoyed this post.  Now, let's drink with out pinkies up like good ole proper folk.

DIY - How to Make an Upholstered Headboard

I had been going back and forth about either buying a headboard or making one to go with my queen sized bed. No matter how many times I looked at my room, it always seemed incomplete.


I know that some people would prefer this cleaner look but I wanted it to look a bit more lux.  I had thought about buying a headboard but the ones that I liked were just way out of my price range but I also wasn't able to find a DIY design that I liked. 

That is, until I read the instructions on Young House Love.  I did have a couple of concerns:
  1. Since this headboard did not have a solid support in the center, how sturdy was the design?
  2. Most of the comments suggested that design would not work well with tufting.
  3. How would you mount the thing?
 But questions aside, I embarked on this mission to make myself a headboard using the Young House Love's design and added a couple tweaks here and there.  I was able to make this headboard in about 3 hours (1 hour if it weren't for the tufting) and less than $100.

What I bought (see below for pictures):
  •  2.5 meters of fabric.  I chose a cotton velvet-like fabric with a matte finish.  It's the same type of fabric that I used for the slip cover on my sofa bed.  I prefer 100% cotton over micro suede because you won't get static electricity.  While micro suede is easier to clean, a fabric protector will provide the protection that you'll need for the cotton fabric.
  • 1 meter of scrap fabric
  • 54" X 42" canvas stretchers (you can buy these at the local art store like Michael's)
  • Staple gun
  • Scissors
  • Rubber mallet
  • Buttons
  • Upholstery grade thread
  • Quilting Needle
  • Batting, about 3-4 meters

pic name
Extra fabric

pic name
Buttons for the tufted detail

pic name
Cotton "velvet" fabric


pic name
My staple gun aka "sharp shooter"

pic name
Cotton Batting

pic name
Polyester Batting


Step one - the frame
Frame stretchers come in separate pieces so you can pick and choose what size works best for you.  Each piece slides into the other to create a frame.  The problem is that it's a bit wobbly because you don't have a center bar to keep it all sturdy so I used a rubber mallet to make sure the corners fit nice and tight.


Canvas Stretchers (separated)

Canvas Stretchers (Assembled)

Step two - create a foundation 
One of my concerns was that the headboard would not be sturdy enough since it was hollow in the center.  I had contemplated on just buying a blank canvas to upholster but then felt that the canvas would be too stiff to create the tufted look.  So, I took strips of rem anent fabric and created a grid like weave. 


pic name

pic name

pic name

Step three - the batting
I chose two types of batting.  For the first layer, I used polyester because it's thicker and sturdier.  For the second layer, I used organic cotton because I liked the feel of it.  Leave about 2-3 inches of batting when you're tracing the shape of the frame so you'll have enough material to staple against the back of the frame.  To prevent bulkiness, I cut the corners:
This is what it looked like once the batting was attached with my staple gun:


Step four - Add the fabric
Follow the same steps from step three to attach the fabric.  Make sure that you pull evenly or else it will pucker and pull.


Step five - Add the buttons for tufting
If it wasn't for this last step, I would have been finished in an hour.  This part added about 2 hours to my project and I still didn't get the affect that I had hoped for.


When adding a tufting effect without the use of a drill and particle board headboard (see Charissa's Tutorial posted on Apartment Therapy), I used the same technique that I did when I tufted some pillows.  Here's an easy to follow tutorial from Burdastyle.

Tufting a pillow with buttons (Tutorial) courtesy of BurdaStyle

Instead of choosing two fabric/ leather covered buttons, I chose to use a standard button at the back just because it was easier for me to see what I was doing.  You will certainly need a quilting needle because these are longer and thicker than your standard needle.  I used a level to measure where I should put the buttons.  This ensured that they were not only evenly spaced but also in straight line.  I had to pull the thread pretty hard, so it is beneficial to loop your thread through the needle twice.  This is what I ended up with:

I was so excited to start this project that I literally kicked off my shoes and ran to my tool box.

Step six - mounting the headboard
I did buy a frame mounting set but realized I didn't need it.  I have the Ikea Engan bed but in order to have storage boxes at the bottom my bed I had to set my mattress rather high.  This, however, turned out to be beneficial.  Since there was already a 1.5 inch gap between the head of the bed and the wall, I simply wedged the headboard in that space.  It's snug as bug.


What I would have done differently:
To create a more tufted look, I would have cut the fabric into little squares and sewed them back together to create some seams.  Yes, this would have added a great deal of time to the project but it might have helped accentuate the tuft detailing.


In addition to this change, I would have also wrapped batting around the entire frame.  That way, when putting the buttons through the headboard, there would have been more fabric to pull on.  The tension might create a more defined tufting look, like the pillows.

So what do you think?  Should I have added more buttons?  Have you successfully made a headboard with tuft details without using a drill and particle board?  I'd love to see pictures of all your projects!