
So, my brain got the startin' to see how I can get what I want without burning a hole in my pocket. I know it's been done but I love silhouettes. People can recognize an icon or image just with the quick gaze of distinct features.
I wanted pillows that would add personality to an otherwise boring fold down sofa. Accents of yellow on the walls, pink knick knacks and a pink table called for pillow companions of the same colour family. It is also no secret that I am completely obsessed with silly little dogs (yet have none of my own).
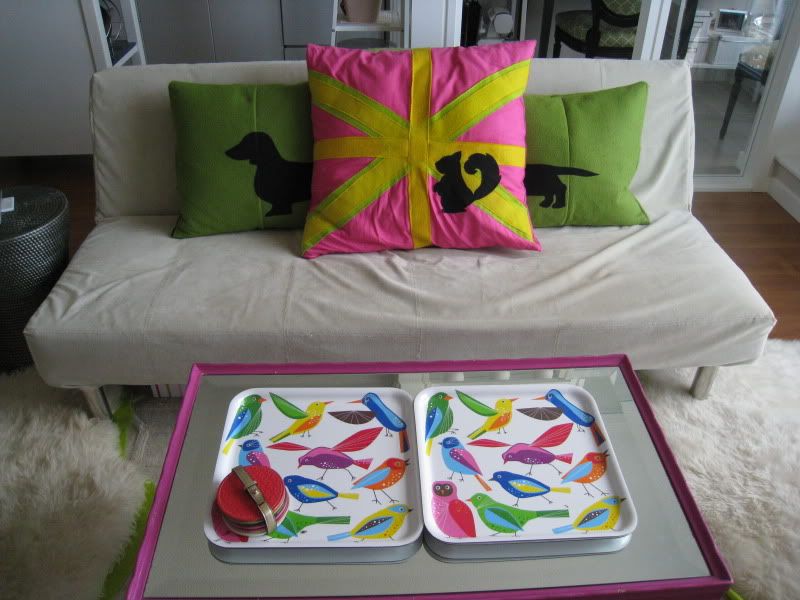
I took these pictures in my old apartment when I was in the middle of packing. I tried to move the boxes around but two of 'em snuck in the picture!
 | |
| Hot Dogs!!!!! |
 | |
| Side one: Dandy Squirrel |
 |
| Picture of the pillows in my new apartment |
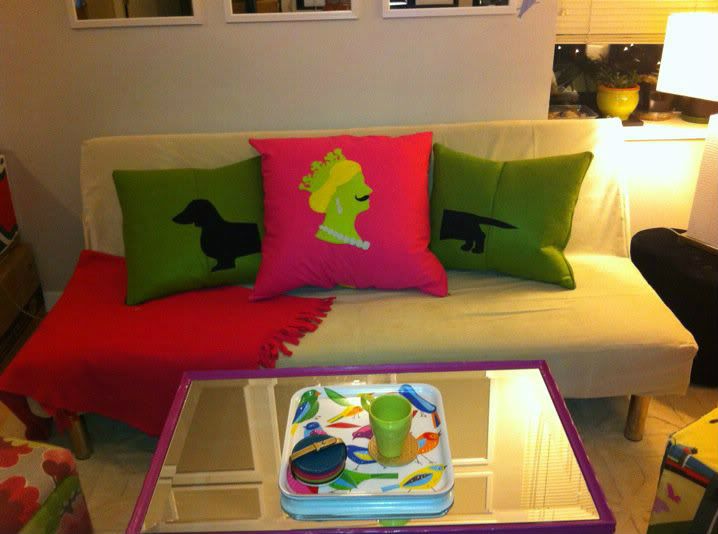 |
| Side 2: Mr. Queen says "Hello!" |
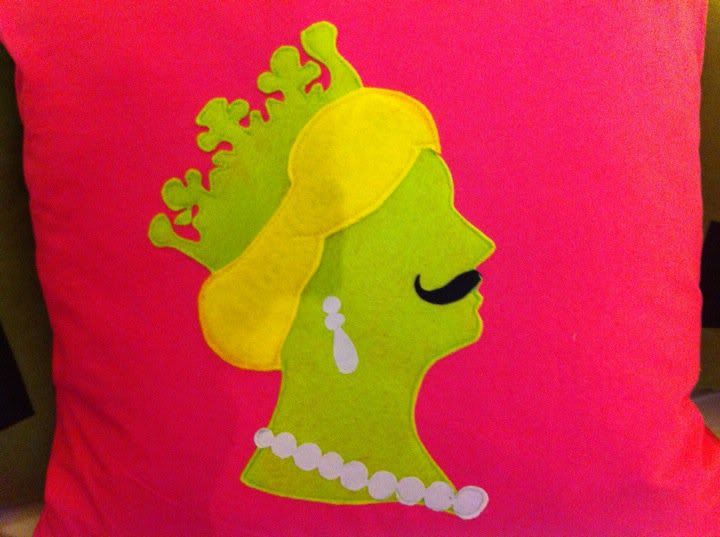 |
| "I'm ready for my close-up". |
While I won't be providing step by step instructions, I can explain how I made the designs on the pillows.
I basically photocopied or drew the design that I wanted for my pillows. The green pillows are made from table mats that I got on Christmas Clearance for about .99 or a buck. They are pure wool. The main fabric of the pink pillow is a mid weight cotton. The accents are either broad cloth or felt. The black fabric is canvas with iron on adhesive on the back (heavy duty). The black fabric adhered well on the felt (iron on the opposite side, not directly on the felt). It was fine on the green wool, as well, and since they are both natural fibers, you can iron it on the high setting directly on the design.
However, after the 4 months, the squirrel started peeling off the lighter cotton. You may want to sew it down after you iron it just to secure it on the fabric.
Once you have found the silhouette of choice get a couple of pins and attach the picture on top of your fabric. Pin it near the edge of the picture as well as in the center, that way they won't shift around when you're cutting. Just cut the paper and the cloth at the same time and with steady hands, you'll get the shape that you want on your fabric.
If you want your silhouette to look similar to Mr. Queen, you will need to create layers. Just follow the same method of tracing and cutting.
Since the edge of cut felt stays put and does not fray, I sewed the pattern on the pink pillow. Again, it is helpful to pin the picture down to prevent the silhouette from moving around when you are sewing.
The total that I spent on these pillows couldn't have been more than $60 in total. It was well worth it.
Hey Pam! I just saw your blog. It's great!
ReplyDeletecheck out mine as well...
It's on fashion, art, culture and travel :)
Nonchalant
Nina
PS. I'll also link to yours as my favorite blogs and if you like mine then I'll be happy if you do the same for me:)
ReplyDeleteHi Nina!
ReplyDeleteI love your blog! Great pics and of course, I love your outfits. Certainly adding you to my list of favs!
<3
Really nice blog! We might try to work a reference to this one into a blog post about Australian pillows next week.
ReplyDeleteAustralian Pillows
Thanks! If you do end up working in a reference to my pillows, please let me know and I will post something on my wall for people to take a sneak peak!
ReplyDeleteBTW, I went to the KAS website - so many beautiful and fun patterns. I really enjoy reading the home decor blogs from Australia.